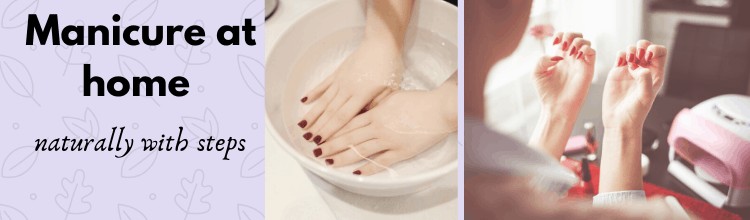
Manicure at home
Manicure also referred to as a nail treatment, is a therapeutic wonder treatment for the fingernails and hands. It is effortless to give yourself a manicure at home ingredients. It is one of the fastest-growing trends in India and other parts of the world.
Most nail liquids can remain on nails for 2-3 weeks before another nail treatment if there is no conscious harm to it.
Manicure at home DIY
A typical manicure at a nail salon can take a lot of time. It can typically take around 1 hour and more if you go all the way to glam up your nails. But now you can easily give yourself an exceptional manicure at home diy. Don’t think that a salon style manicure typically is a very tough skill.
Regardless of whether you’re attempting to set aside cash or heading off to the salon is impossible, there will never be a terrible chance to ace doing a great manicure at home diy as you saw in 10 minutes pedicure at home. Not exclusively is there a genuine fulfilment in painting your nails. However, it can likewise have healing advantages.
With the correct manicure kit and some tolerance, you can do a great, salon-like manicure at home naturally. A noteworthy manicure at home diy includes not only shaping and glamming your nails, but it is much more than that.
So, assemble all the tools for your manicure kit and just follow these simple steps for your beautiful and therapeutic manicure at home steps. Manicure also referred to as a nail treatment, is a therapeutic wonder treatment for the fingernails and hands. It is effortless to give yourself a manicure at home. It is one of the fastest-growing trends in India and other parts of the world.
Most nail liquids can remain on nails for 2-3 weeks before another nail treatment if there is no conscious harm to it.
Manicure kit at home
Sometimes, it happens that you can’t go to a nail salon for a manicure and need to give yourself a manicure at home with natural ingredients, well now you can without much of stress give yourself a manicure at home steps by making a manicure kit at home.
Don’t stress about how are you going to make a manicure kit at home or how are you going to get hold of those salon manicure kit tools. Most of the tools you will require for your manicure kit are very readily available at home, and if in case some of these tools are not available, you can purchase them online.
So, gear up to make a DIY manicure kit to glam your fingernails and give yourself a superb and therapeutic manicure at home with natural products.
Tools needed for your DIY manicure kit –
You may need to go through a minimal expenditure in advance to get all that you require for a good manicure at home steps. Putting money into tools for your manicure kit will give returns to you in the longer run.
• Tub of warm water
• Bath salt/rock salt/shampoo/any essential oil
• Cotton balls
• Clear nail paint
• Nail polish
• Nail colour remover
• Hand cream or hand moisturizer
• Dry towels
• Nail cutter/nail clipper
• Nail filer/scrubber
• Hand scrub/manicure scrub
• Cuticle nipper (optional)
• Cuticle pusher
• Nail buffer (optional)
• Cuticle oil/ cuticle cream (optional)
• Orangewood stick (optional)
Note- Some tools are not so crucial for your manicure kit. It means that you can include or exclude some of the devices according to your requirements. But make sure to not eliminate the necessary and vital tools from your manicure kit.
Given below is the description of some of the tools so that you can make a clear choice whether to include it in your manicure kit or not.
• Nail filer/scrubber

This instrument is a small, helpful and vital manicure kit tool that gives shape to the fingernails, mainly the edges of the nails.
• Nail buffer (optional)

This tool gives fingernails a serious shine sparkle. This manicure kit tool can also clean your nails.
• Cuticle nipper (optional)

Cuticle nipper is an optional tool. You can eliminate this tool from your manicure kit as per your requirement. This little apparatus trims or cuts back hard skin on the edges of the fingernails.
• Cuticle pusher

It pushes your fingernail skin back and causes your nail to become more advantageous and more grounded.
• Cuticle oil/cuticle cream (optional)

Cuticle cream and cuticle oil can help relax unpleasant fingernail skin and shield you from contaminations. Although it is optional, these creams/oils are great to include in your manicure kit.
• Orangewood stick (optional)

This tool is similar to cuticle pusher, but it can be used for various other things also.
• Clear nail polish

As the name suggests, this nail paint doesn’t have any colour pigments, and it is mostly used for a base coat and topcoat.
Manicure at home steps
To give yourself a beautiful manicure at home with natural ingredients, you need to follow some easy steps.
So, follow these manicure steps to beautify your nails and getting benefits of your manicure at home steps –
1. Cleaning and removing any traces of previously applied nail colour
2. Trimming the rough edges of the fingernails
3. Filing and shaping the fingernails
4. Buffing your fingernails
5. Soaking your fingernails and hands
6. Applying cuticle oil or cuticle cream
7. Moisturizing and massaging your hands and fingers
8. Getting the fingernails ready to apply nail colour
9. Glamming the fingernails
Base coating the fingernails
Using the desired nail paint
Final clear polish coat
10. Undo the smudges
Let’s see all the manicure at home steps in detail –
1. Cleaning and removing any traces of previously applied nail polish
This step includes two things.
• Cleaning your fingernails- before starting your manicure at home diy, you need to properly clean your nails to ensure the smooth finish at the end. To clean your fingernails, you first need to wash your hands with a hand wash or hand soap. Now after properly painting your nails, you need to use a clean towel to dry your hands properly. While doing this, you need to ensure that your fingernails are adequately dried because if not, you will not be able to apply nail paint properly.
• Removing any traces of previously used nail polish – after enough cleaning your hands and fingernails, now it is time to remove all the evidence of prior applied nail polish. If you have not applied any nailpolish previously, you don’t need to worry. But in case you had applied nail polish before, you need to use a cotton pad remover and nail paint remover to remove all the traces of previous nailpolish. You can replace the cotton pad with a clean and dry towel if you desire. You also have to ensure to remove acrylic nails or artificial nails before start your manicure at home.
Note – Always use clean and dry cotton pads and dry towels and always clean these used towels/cotton pads after you have used them.
Special tip – sometimes after using a nail paint remover, a yellow tint or some remote spots are visible on the fingernails, in this case, you need to rub fingernail oil also called cubicle oil to get rid of such yellow spots.
2. Trimming the rough edges of the fingernails
Trimming your fingernails is extremely important. The vast majority generally accept this isn’t a significant advance; thus, the vast majority like to avoid this progression. In any case, what they don’t understand is that cutting the fingernails isn’t just significant for a manicure at home; however, cutting is substantial for your nails. It may sound peculiar, yet this is valid. The scientific logic behind this is that long fingernails have more space to contain dust and dirt. And if dirt particles remain underneath your fingernails for long, it can prompt nail ailments. In this way, next time you need to do a manicure at home naturally, ensure that you trim your fingernails and remove the dirt particles underneath.
To trim the rough edges of your fingernails, you need to use a nail clipper or nail cutter. Remember that you need to only trim down the sharp edges of your fingernails at this step. You do not need to stress if you cannot do this properly because you can perfect it at the next level.
3. Filing and shaping the fingernails
Now you have to give shape to your fingernails. You can provide various forms to your nails. Some of the styles from which you can choose are – round, oval, almond, edge, squoval, stiletto, and square. Giving shapes, like a stiletto and squoval, is rather challenging to achieve for a manicure at home with natural ingredients. Still, you can always try or else you can always choose from simple shapes like round etc.
You need to utilize a nail filer to give the ideal shape to your fingernails. You can likewise select to not use a nail filer on the off chance that you need to keep up the normal state or the natural state of your toenails. For this situation, you can simply utilize a nail scrubber to smooth down the edges of your fingernails. But the best option is to use a nail buffer block to smooth down the sides of your fingernails while maintaining the natural state of your fingernails.
4. Buffing your fingernails
You might wonder whether or not buffing your fingernails is necessary or not. Well, you can skip this step if you are in a hurry but remember that going straight into painting your nails for polishing will noticeably affect how your final manicure at home turns out. To buff your fingernails, you’ll have to float a nail buffer block over each for some time depending on the roughness of your fingernails, moving to and fro until you can feel (and see) that your nail is smooth.
Special tip – Make sure to do this step if you need your manicure at home to be impressive.
5. Soaking your fingernails and hands
This step is by far the most relaxing step for your manicure at home naturally.
For this step follow these simple manicure procedure –
• Take a bowl (big enough to fill both your hands)
• Fill it with warm water.
• Mix bath salts, rock salts, or any sulfate-free shampoo in the warm water
• If you don’t want to do this and want to keep it plain and simple, mix lemon juice or some drops of your favourite essential oil to the warm water.
• You can also drop some rose petals in the water for a more relaxed feeling.
Soak your hands in the water for 15-25 minutes as per your comfort.
Alert – Take your hands out of the bowl in case you feel itchy or irritated.
6. Applying cuticle cream or cuticle oil
Now wipe your hands and fingernails with a dry towel and then apply cuticle oil or cuticle cream or cuticle oil, whatever suits you onto your nails. Now, utilize a fingernail skin pusher (cuticle pusher) to push the fingernail skin back delicately. Try not to apply an excess of weight since that may drive the fingernail skin excessively far in and harm your nails. The extra pressure likewise expands your odds of getting a disease. After this, you need to wipe out the excess oil or cream from your fingernails so that you can apply nail polish with ease.
7. Moisturizing and massaging your hands and fingers
Back rub your hands and fingers with hand lotion or a hand moisturizer. Utilize a rich and thick cream for exceptional moisturization. For doing this, you need to concentrate mainly on your fingers and the zone around your nails. Additionally, massaging your hands and palms will give you various therapeutic benefits. For example – if you rub your hands and palms, it will relax all the hand muscles. What most people don’t realize is that massaging can help heal injuries. Don’t forget to rub your hands and palms to take all the benefits from your manicure at home.
Special tip – If you need your hands and fingers to be extra soft and smooth, use a hand scrub before moisturizing. You can buy hand scrubs already available in the market or make one for your manicure at home naturally.
8. Getting the fingernails ready to apply nail polish
For this, the only thing you need to remember is that if you have applied too much moisturizer, lotion or any cream, you need to wipe it off. It is required because if there is excess lotion or moisturizer on your nails, nail polish will not stick to your nails. It also means that in case of excess moisturizer on your nails, you will face difficulty in applying nail colours. To remove excess cream and oil use a Q-tip or a clean cotton pad. Make sure that the cotton pad or Q-tip is not wet because if it is damp, then it will mess things up and make your job of a manicure at home steps more difficult.
9. Glamming the fingernails
Glamming your fingernails includes three manicure procedures –
Base coating the fingernails – This step involves applying a thin base coat before actually applying the nail polish colour. You have to use clear nail polish with zero colour pigment to apply the thin base coat. A base coat keeps your nails from getting recoloured (particularly in case you wearing shades of red, black or blue). Additionally, a base coat enables the nail paint to last for a longer time duration.
Special tip – if you want your nail polish colour to pop out, use a white colour nail to apply the thin base coat.
• Applying the desired nail paint – Always remember to roll the nail paint bottle before using it. It is necessary to blend all the colour inside the container and remove all the air bubbles if any. Many people it with shaking the nail colour bottle. It is not useful as it results in the creation of air bubbles rather than eliminating it. So, make sure to roll the bottle and not shake the bottle. You also need to do this for that smooth finish at the end of your manicure at home. Make sure to apply the even coat of colour while applying the nail polish and avoid using excess nail colour onto your nails.
Only one coat of nail polish is not enough. Apply another coat after the first coat is dried up.
• Final clear polish coat – This step is vital for your manicure at home with natural ingredients to complete with perfection. You should always use clear nail polish for the last layer. Remember to apply a thin and even final coat of bright nail paint. Also, avoid applying it in excess quantity. You need to concentrate fully on this final coat because it will make or break your manicure at home.
10. Undo the smudges
It is the last step and rather comfortable. Dip a Q-tip in the nail paint remover and use it to undo or clean any smudge left or us it to clean out any nail polish on your skin.
These are the manicure steps to follow for a manicure at home diy.

Manicure at home to remove tan naturally
To remove tan naturally, you can either use various manicure scrubs available in the market to remove tan or one yourself for a manicure at home. These scrubs are easy to make and make use of all the natural ingredients.
Olive oil and sugar manicure scrub
This scrub is handy for your manicure at home diy. This scrub will ensure that your hands appear brighter and also makes them super soft.
Things needed:
3 tsp of sugar (powdered sugar not recommended)
1 tsp of olive oil (you can increase the quantity as per your wish)
Processing time: 2-5 minutes
Manicure procedure:
• Take 3 tsp of sugar particles in a bowl and then add 1 tsp of olive oil in it.
• Whisk them together until you get a spreadable paste.
• Wet your hands and then apply this scrub onto your hands.
• Spread all the scrub onto your hands.
• Now start massaging the scrub in circular motions. Remember to use your fingertips for this—massage for around 2-3 minutes.
• Leave it for 2 minutes.
• Now gently clean the scrub with cold water.
• Use a hand lotion or moisturizer after drying up your hands.
lemon and sugar scrub
Things needed: One lemon, 2 tsp sugar (powdered sugar not recommended)
Processing time: 2 minutes
Manicure Procedure:
• Grate the peel of a lemon and then collect the lemon zest.
• Add the collected lemon zest in 2 tsp sugar. Now, add one whole lemon juice in it and make a spreadable scrub.
• Wet your hands and then apply this scrub onto your hands.
• Spread all the scrub onto your hands.
• Now start massaging the scrub in circular motions. Remember to use your fingertips for this—massage for around 2-3 minutes.
• Leave it for 2 minutes.
• Now gently clean the scrub with cold water.
• Use a hand lotion or moisturizer after drying up your hands.
Some common doubts regarding manicure at home diy.
What are the different manicure types?
The different types of manicures available are – basic manicure, French manicure, reverse French manicure, mirror manicure, hot oil manicure, soak-off gel manicure, shellac manicure, acrylic manicure, spa manicure etc.
What are the benefits of a manicure at home diy?
Manicure at home diy has several benefits. Some of these include – cleaning of the nails, cleaning of the dirt particles underneath the long fingernails, Nourished cuticles, improved blood circulation, softening of the hands and palms, relaxation and therapeutic benefits.
What are some of the essential points to remember for a manicure at home steps?
• Always use a nail buffer for an added smooth finish.
• It is indispensable to apply a base coat of clear nail.
• Always remove any tint of previously applied nail color before starting your manicure.
• You should fix all the smudges immediately. You should not wait till the end to fix the mistakes. Instead set the errors as and when it occurs.
Manicure service at home
If you still think doing a manicure at home is not easy you can opt for the manicure service at home. We can provide you with various manicure home services. Some of these are –
- Normal manicure – ₹250
- D-tan manicure – ₹400
- Normal spa manicure – ₹500
- Lotus spa manicure – ₹600
Now that you have a bunch of tip and tricks do pamper your hands and let us know about your experience. Have happy hand!